26 Years of Award Winning Baking & Dessert Video Recipes

breakfast & brunch bars & squares cupcakes shortbreads breads youtube channel
about us
recipe index
substitutions
ingredients
glossary
conversions
weight vs volume
easter baking
apple recipes
pumpkin recipes
cranberry recipes
chocolate recipes
healthy baking
eggless recipes
comfort foods
blueberry recipes
biscotti recipes
pudding recipes
english tea party
trifle recipes
ice cream recipes
strawberry recipes
lemon recipes
thanksgiving baking
candy recipes
halloween baking
valentine's baking
christmas cookies
christmas baking
christmas candy
baking history
bibliography

 
Subscribe Now
 

Cream Buns Recipe & Video

Printer Friendly Page

Cream Buns are popular around the world. They may be called different names, but they are similar in that they are all made with an enriched yeast bread that is filled with lots of whipped cream. These delicious Buns have a golden brown crust and a texture that is wonderfully soft and fluffy. They are similar in taste and texture to a Brioche Bun, just not as rich. Besides whipped cream, a dollop of jam, lemon curd, or even almond paste may be hidden inside. Best enjoyed the day they are made, but they can be covered and stored in the refrigerator for a day or two.  


To make these yeast Buns really flavorful, I like to add a Sponge. A Sponge is just a small amount of bread dough that is made the night before and stored at room temperature overnight so it has time to become nice and spongy. Next morning when you make your bread dough, you simply add the Sponge along with the other ingredients.

As far as ingredients go, we are using mainly unbleached All Purpose Flour and unbleached Bread Flour in the Sponge. For the yeast, I like to use SAF Red instant yeast #ad in the Sponge, and SAF Gold instant yeast #ad in the main bread dough. Instant yeast gives a good rise and it doesn't need to be proofed. However, if you want to substitute active dry yeast for instant yeast you need to increase the amount of yeast by about 20%. You also need to activate the yeast in warm water. To do this, remove about 1/4 cup (60 grams) water from the total amount called for in the recipe and heat it to lukewarm. Stir in the yeast. Let stand about 5-10 minutes or until the mixture becomes frothy. Dried milk powder is added to the dough as it enhances the color of the crust, adds flavor, and helps to keep the bread moist. For the salt, I like to use a fine kosher salt. There is also butter in this dough, and I like to use unsalted butter. And lastly, I like to use cold filtered water.

Related Recipes You May Like

Cream Puffs

Chocolate Brioche

Brioche Recipe

Fruit and Cream Brioche Buns

Artisan White Bread

White Sandwich Bread

Sponge: In a medium sized bowl, stir the flour with the yeast. Make a well in the center of the dry ingredients and pour in the water. With a plastic scraper or wooden spoon, work the flour into the liquid, until all the flour has been moistened. Place into a medium sized container that has been lightly oiled, cover, and let it sit (ferment) at room temperature for 12 - 14 hours. (During that time it will double in size and become nice and spongy.)

Buns: In a large bowl, stir the flour with the yeast, salt, sugar, and dried milk powder.

Pour the cold water into the bowl of your electric stand mixer, fitted with the dough hook. Then add the Sponge (cut into pieces), the egg, and the flour mixture. Knead the dough on 1st speed for about 5 minutes. Increase your mixer speed to 2nd speed and continue to knead the dough for about 4 to 5 minutes or until the dough cleans the bowl and is smooth, elastic, and a little sticky. (If the dough is too sticky, knead it a minute or two longer.) Add the butter and continue to knead the dough, on 2nd speed, for another 3 to 5 minutes or until the dough cleans the bowl and is smooth and elastic, and a little sticky.

Place your dough in a large bowl that has been lightly oiled. Cover with plastic wrap and let sit (ferment) at room temperature (about 75 degree F) (24 degree C) for one hour.

Next, turn out your dough onto a lightly floured surface. You want the top of the dough to now be on the bottom. Lightly flour the top of your dough and with the palms of your hands flatten the dough slightly to get rid of any air bubbles. Then divide the dough into 12 equal pieces (about 73 grams each). When you divide the dough use a pastry scraper or knife and cut, don't pull or stretch, the dough. Then, working with one piece of dough at a time, flatten the dough into a round. Next, take the edges of the dough and fold them into the center and gently seal. Then flip your dough over so the smooth side is facing up. With the palm of your hand rotate the ball of dough, on an unfloured surface, to create surface tension and to seal the edges of the dough completely. Place the Buns on a baking sheet, that has been lined with parchment paper. Cover the pan with plastic wrap that has been lightly oiled or sprayed with a non stick vegetable spray and let proof at room temperature for about 1 1/2 hours. (If you lightly press into the dough, your finger will leave a slight indentation.)

Egg Wash: In a small bowl, whisk the egg yolk with the cream.

Meanwhile, preheat your oven to 400 degree F (200 degree C).

When the Buns are ready to bake, remove the plastic wrap.  With a pastry brush, lightly brush the Buns with the egg wash. Bake for about 14 - 16 minutes or until the Buns are golden brown. If you tap the Bun it will sound hollow. About halfway through baking, turn your pan front to back to promote even baking. Remove from oven and place on a wire rack. Let the Buns cool completely before cutting and filling with the whipped cream.

Whipped Cream: In the bowl of your electric stand mixer, fitted with the whisk attachment (or with a hand mixer, or by hand with a wire whisk), place the whipping cream, sugar, and vanilla extract and whip until stiff peaks form. Place the whipped cream in a pastry bag, fitted with a large star tip (#1M).
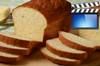
Cream Buns: Using a sharp knife, horizontally cut the tops off of each Bun. Pipe swirls of the whipped cream on the bottom half of each Bun. Dust the tops of the Buns with powdered sugar and place on the whipped cream. Best eaten the day they are made, but they can be covered and stored in the refrigerator for a day or two. The unfilled Buns can be frozen for one month.

Makes 12 Cream Buns.

View comments on this recipe on YouTube

Sponge:

1 cup minus 1 tablespoon (115 grams) unbleached bread flour

1/8 teaspoon SAF Red instant yeast Available on Amazon #ad

1/4 cup plus 1 tablespoon (75 ml/grams) cold filtered water

Buns:

2 2/3 cups (350 grams) unbleached All Purpose Flour

1 1/4 teaspoons (4 grams) SAF Gold instant yeast  Available on Amazon #ad

2 teaspoons (8 grams) fine kosher salt

2 tablespoons (28 grams) granulated white sugar

3 1/2 tablespoons (25 grams) dried milk powder

2/3 cup plus 2 tablespoons (185 ml/grams) cold filtered water

1 large cold egg (50 grams out of shell)

5 tablespoons (70 grams) unsalted butter, at room temperature, cut into pieces

Egg Wash:

1 large egg yolk (about 17 grams), at room temperature

1/2 tablespoon cream (light or heavy)

Whipped Cream:

2 cups (480 ml/grams) cold heavy whipping cream (cream with a 35-40% butterfat content)

1/4 - 1/3 cup (50 - 65 grams) granulated white sugar (or to taste)

1/2 - 1 teaspoon (2 - 4 grams) pure vanilla extract

Subscribe Now


New Videos


Contact Us   Privacy Policy

Use of materials on all pages on the domains Joyofbaking.com, joyofbaking.mobi, the Joyofbaking.com Facebook Page, @joyofbaking on Twitter, the Joyofbaking.com RSS Feed, the Joyofbaking.com email list the Joyofbaking1 YouTube Channel and any emails sent from @joyofbaking.com are entirely at the risk of the user and their owner, iFood Media LLC will not be responsible for any damages directly or indirectly resulting from the use.

References cited may include a link to purchase the referenced book or item on Amazon.com. Joyofbaking.com receives a commission on any purchases resulting from these links.

This website and the contents are not endorsed or sponsored by the owner of the "Joy of Cooking" series of books or its publisher Simon & Schuster, Inc. and is not related to the  "Joy the Baker" books and website. Video icons by Asher.

Content in any form may not be copied or used without written permission of Stephanie Jaworski, Joyofbaking.com.  Students and non profit educators may use content without permission with proper credit. 

A baking resource on the Internet since 1997

Copyright  1997 to 2023 iFood Media LLC