26 Years of Award Winning Baking & Dessert Video Recipes

breakfast & brunch bars & squares cupcakes shortbreads breads youtube channel
about us
recipe index
substitutions
ingredients
glossary
conversions
weight vs volume
easter baking
apple recipes
pumpkin recipes
cranberry recipes
chocolate recipes
healthy baking
eggless recipes
comfort foods
blueberry recipes
biscotti recipes
pudding recipes
english tea party
trifle recipes
ice cream recipes
strawberry recipes
lemon recipes
thanksgiving baking
candy recipes
halloween baking
valentine's baking
christmas cookies
christmas baking
christmas candy
baking history
bibliography

 
Subscribe Now
 

Soft Pretzel Sticks Recipe & Video

Printer Friendly Page

If you enjoy homemade soft pretzels, than you must try these Soft Pretzel Sticks. While they don't have that twisted pretzel shape, they still have that wonderful pretzel flavor and texture, only with the added flavor of melted cheese. Did you know that the big difference between regular bread and a pretzel, is that pretzels are boiled and then baked? It is the boiling that gives the outside of the pretzel its beautiful golden brown color and uniquely crisp yet chewy texture


Commercially made pretzels are boiled in a mixture of water and food lye. That is how the pretzels get their crisp and chewy outside crust. But you have to be very careful when using food lye, wearing goggles and rubber gloves as you don't want any touching your skin. So what I like to do instead, which gives you almost the same results, is to boil the Pretzel Sticks in a mixture of water and baking soda (bicarbonate of soda).

A few notes on ingredients. The recipe calls for both All Purpose (Plain) Flour and Bread Flour. The addition of bread flour helps to give the pretzels their chewy texture. I have used SAF Red Instant Yeast in this recipe. This type of yeast gives a good rise, especially when making breads with long fermentation periods. An added bonus is that since the grain particles are so small, it doesn't need to be proofed. However, you can use active dry yeast (2 teaspoons - 6 grams) but you will have to first activate the yeast in the water (have the water warm). We also add some dry malt (diastatic) powder which breaks down the starch and gives sugar for the yeast to feed on. This is especially good for a dough like this, that has a long fermentation period. Malt powder also aids in browning. For the salt I like to use kosher salt. And lastly we need water. I like to use cold, from the fridge, filtered water.

Related Recipes You May Like

Homemade Soft Pretzels

Cinnamon Rolls (Buns)

Cinnamon Roll Bread

Hot Cross Buns

Cake Doughnuts

Eggs and Ham Pie

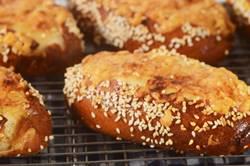
Soft Pretzel Sticks: Place the flours, yeast, dry malt powder, and salt in the bowl of your electric stand mixer, fitted with the paddle attachment. Beat until combined. Add the butter and water and beat until combined. Replace the paddle attachment with the dough hook, and knead the dough on 1st speed for five minutes. Increase your mixer speed to 2nd speed, and continue to knead the dough for another four minutes. The dough should be smooth and elastic. To check to see if the dough is fully kneaded, use the 'windowpane' test. (See video for demonstration.) To do this, start with a small fistful of dough. Gently stretch it. For a fully kneaded dough you should be able to stretch the dough without it tearing. If it easily tears, knead the dough for another minute or two.

Cover the dough and let sit, at room temperature, for about ten minutes. Next, divide the dough into 8 equal portions (each portion should weigh about 75 grams). Working with one piece of dough at a time, flatten into a round. (You may want to lightly flour your hands.) Take the edges of the dough and fold them into the center and gently seal. Then flip your dough over so the smooth side is facing up. With the palm of your hand rotate the ball of dough on your surface to create surface tension and to seal the edges of the dough completely. Cover loosely with plastic wrap and let sit, at room temperature, for about 10 minutes.

Next, working with one piece of dough at a time, you want the top of the dough to now be on the bottom, flatten the dough into a rectangle. Fold over the top third of dough and gently seal. Then fold over the top half of dough and seal. Finally, take the top of the dough and fold it to the bottom edge of the dough and seal. (See video for demonstration.) With the palms of your hands gently roll the dough back and forth (creates tension). Place the logs of dough (seam side down) on a parchment paper lined baking sheet that has been lightly dusted with flour. Cover with plastic wrap, and let proof (ferment) for about 30 minutes at room temperature. Remove the plastic wrap and place the baking sheet, with the logs (sticks) of dough, in the refrigerator to chill overnight (adds flavor). (The dough is left uncovered so it will form a skin.)

Next morning, remove the baking sheet, with the dough, and place at room temperature about 30 to 60 minutes before boiling.

Preheat your oven to 450 degrees F (230 degrees C).

In a large pot or Dutch oven, mix 1/3 cup (90 grams) baking soda into 8 cups (2 liters) water. Cover and bring the water to a boil over high heat.

Next, using a slotted spoon or wire skimmer, gently place three pretzel sticks into the boiling water. Boil for about 30 seconds, then turn the pretzels over and boil for an additional 30 seconds. Remove the pretzels from the water using your slotted spoon, drain, and place the pretzel sticks back onto your baking sheet. Repeat this process with the remaining pretzels.

In a small bowl, whisk the egg yolk with the cream. With a pastry brush, lightly brush the tops of the pretzels with the egg wash. If desired, sprinkle the pretzels with sesame seeds, pretzel salt, or poppy seeds. With a razor blade or sharp knife, cut a slit down the center of each pretzel stick. Fill the slit with shredded cheese and sprinkle the top of the cheese with sweet paprika (if desired).

Bake the pretzels for about 14 - 15 minutes or until golden brown. Half way through baking, turn your baking sheet front to back. Remove from oven and place on a wire rack to cool. Homemade pretzels are at their best the day they're made. But they can be covered and stored at room temperature for two to three days.

Makes 8 - 4 inch (10 cm) Soft Pretzel Sticks.

View comments on this recipe on YouTube

Pretzel Dough:

1 3/4 cups (225 grams) all-purpose flour

1 cup (130 grams) bread flour

2 teaspoons (6 grams) SAF Red Instant Yeast (or 2 teaspoons (6 grams) active dry yeast)

2 1/2 teaspoons (8 grams) dry malt (diastatic) powder

1 1/2 teaspoons (6 grams) salt

2 tablespoons (25 grams) soft unsalted butter

7/8 cup (210 grams) cold filtered water

Water:

1/3 cup (90 grams) baking soda (bicarbonate of soda)

8 cups (2 liters) water

Glaze:

1 large egg yolk (about 17 grams)

1 tablespoon cream

Garnish:

Pretzel Salt, Sesame Seeds, and/or Poppy Seeds

2 ounces (60 grams) Shredded Parmesan, Asiago, or Swiss Cheese

Subscribe Now


New Videos


Contact Us   Privacy Policy

Use of materials on all pages on the domains Joyofbaking.com, joyofbaking.mobi, the Joyofbaking.com Facebook Page, @joyofbaking on Twitter, the Joyofbaking.com RSS Feed, the Joyofbaking.com email list the Joyofbaking1 YouTube Channel and any emails sent from @joyofbaking.com are entirely at the risk of the user and their owner, iFood Media LLC will not be responsible for any damages directly or indirectly resulting from the use.

References cited may include a link to purchase the referenced book or item on Amazon.com. Joyofbaking.com receives a commission on any purchases resulting from these links.

This website and the contents are not endorsed or sponsored by the owner of the "Joy of Cooking" series of books or its publisher Simon & Schuster, Inc. and is not related to the  "Joy the Baker" books and website. Video icons by Asher.

Content in any form may not be copied or used without written permission of Stephanie Jaworski, Joyofbaking.com.  Students and non profit educators may use content without permission with proper credit. 

A baking resource on the Internet since 1997

Copyright  1997 to 2023 iFood Media LLC