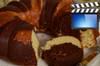
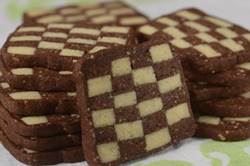
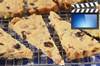
26 Years of Award Winning Baking & Dessert Video Recipes

breakfast & brunch bars & squares cupcakes shortbreads breads youtube channel
about us
recipe index
substitutions
ingredients
glossary
conversions
weight vs volume
easter baking
apple recipes
pumpkin recipes
cranberry recipes
chocolate recipes
healthy baking
eggless recipes
comfort foods
blueberry recipes
biscotti recipes
pudding recipes
english tea party
trifle recipes
ice cream recipes
strawberry recipes
lemon recipes
thanksgiving baking
candy recipes
halloween baking
valentine's baking
christmas cookies
christmas baking
christmas candy
baking history
bibliography

 
Subscribe Now
 

Checkerboard Cookies Recipe & Video

Printer Friendly Page

Besides being a great looking cookie, I love how Checkerboard Cookies give you both a chocolate and a vanilla cookie in one. Unlike most Checkerboard Cookies that have just four squares (two white and two chocolate), this recipe has a more complex checkerboard design with 24 squares (12 white and 12 chocolate). While a little more time consuming to make, the results are simply amazing.    


This is a what is called a 'refrigerator' or 'icebox' cookie. By that I mean the batter is shaped into a log, refrigerated until firm, evenly sliced into cookies, and baked. What is so nice about these cookies is that the unbaked log can be made ahead and frozen for a couple of months. This recipe is based on the Checkerboard Cookie recipe in Nancy Baggett's excellent 'The International Chocolate Cookbook'. I say 'based' because I did make changes to her recipe. 

This cookie batter is very easy to make. You start by making a white batter and then unsweetened cocoa powder, ground almonds, and a little coffee are added to half the batter. You can use either commercially made ground almonds or you can take blanched almonds and process them. To do that, I like to put the blanched almonds, along with the unsweetened cocoa powder, in your food processor and process until finely ground. This prevents the almonds from turning into a paste.

While making the checkerboard design does take a bit of rolling, chilling, cutting, and stacking, it really isn't difficult. The important thing is to not rush the process. Make sure you roll the dough to the desired size, chill it well, and then use a ruler so the strips are all cut into equal lengths and widths. When stacking the layers I like to first brush the dough with a little strained apricot preserves (heat the preserves until fluid and then strain, adding a little water if too thick). This not only helps the layers adhere to each other but it also adds a nice flavor to the cookie.

Related Recipes You May Like

Chocolate Marble Bread

Black and White Cookies

Chocolate Cookies

Marble Cake

Chocolate Wafers

Brownies, Cream Cheese

Checkerboard Cookies: In a bowl whisk the flour with the salt. 

In the bowl of your electric mixer (or with a hand mixer), beat the butter until creamy. Add the sugar and vanilla extract and beat until light and fluffy (about 2 minutes). Add the egg and beat until well blended. Scrape down the sides and bottom of your bowl as needed. Add the flour mixture and beat just until incorporated. 

Divide the dough in half (370 grams each) and place one half of the dough back into the bowl of your electric mixer. Add the cocoa powder, ground almonds, and coffee (if using) and beat until incorporated.

Take two sheets of parchment or wax paper and roll the white dough into a 6 1/2 x 10 1/2 inch (16.5 x 26.5 cm) rectangle, making sure both sides of the dough are smooth. So, as you roll, periodically check the top and bottom sheets of parchment and smooth out any wrinkles. Then place the dough on a baking sheet (along with the parchment paper) and place in the freezer until firm (about 15 minutes).

Next, take the chocolate dough and remove a scant 1/2 cup (95 grams) (used later for wrapping the checkerboard log) and cover with plastic wrap. Again, take two sheets of parchment or wax paper and roll out the remaining chocolate dough into a 6 1/2 inch by 10 1/2 inch (16.5 x 26.5 cm) rectangle, making sure both sides of the dough are smooth. Put the dough on a baking sheet (along with the parchment paper) and place in the freezer until firm (about 15 minutes).

When both the white and chocolate doughs are firm, remove from freezer and place the white dough on a cutting board, removing the top piece of parchment paper. With a pastry brush, lightly brush the top of the white dough with a thin coating of the strained apricot glaze (or water) (this helps the layers to stick together). Remove the parchment paper from the chocolate dough and gently place it on top of the white dough, pressing down so it adheres to the white dough. Trim the edges of the dough so the rectangle now measures 6 x 10 inches (15 x 25 cm). (Take the chocolate dough trimmings and add to the 1/2 cup of reserved chocolate dough.) Then cut the rectangle lengthwise into thirds (3 - 2 x 10 inch (5 x 25 cm) wide stripes). Place one strip on a piece of parchment or wax paper. Brush the top of the dough with apricot glaze and place the second strip on top of the first (alternate colors so you have white then chocolate pattern). Repeat the process. Lightly press down on the top of the dough so the layers adhere to each other and then wrap and freeze for about 15 minutes, or until firm.

Meanwhile, take the reserved chocolate trimmings and roll between two sheets of parchment or wax paper into a 9 x 10 inch (23 x 25 cm) rectangle, making sure the dough is smooth. Put the dough on a baking sheet (along with the parchment paper) and place in the refrigerator until slightly firm but still pliable (about 15 - 20 minutes).

Finally, when firm, remove the cookie log from the freezer and unwrap, placing the dough on a cutting board. Using a sharp knife, cut the layers lengthwise into 4 - 1/2 inch (1.25 cm) wide by 10 inch (25 cm) long strips. Stack the layers, first brushing the bottom layer with the apricot preserves, turning every other strip so top faces down and bottom faces up, to produce the checkerboard effect. Finally, wrap the chocolate dough completely around the checkerboard log until you have a smooth surface. Wrap in plastic and freeze until firm. At this point the log can be frozen for up to two months.

When you're ready to bake the cookies, preheat your oven to 350 degrees F (180 degrees C). Line a baking sheet with parchment paper. Remove the checkerboard log from the freezer and place on a cutting board. With a sharp knife cut the log into 1/4 inch (.75 cm) thick slices. Place on your prepared baking sheet spacing about 2 inches (5 cm) apart. Bake for about 8 minutes or until the cookies are firm around the edges but still a little soft in the center. Remove from oven and place on wire rack to cool. 

Baked cookies can be stored in an airtight container up to one week.

Makes about 35-40 cookies.

View comments on this recipe on YouTube

Checkerboard Cookies:

1/3 cup (45 grams) ground almonds

2 tablespoons (15 grams) unsweetened Cocoa Powder (regular unsweetened or Dutch processed)

2 teaspoons coffee (optional)

2 1/2 cups (325 grams) all purpose flour

1/2 teaspoon (2 grams) salt

1 cup (225 grams) unsalted butter, at room temperature

3/4 cup (150 grams) granulated white sugar

1 1/2 teaspoons (6 grams) pure vanilla extract

1 large egg, at room temperature (55 grams without shell)

1/4 cup (75 grams) strained apricot preserves (or water)

Subscribe Now


New Videos


Contact Us   Privacy Policy

Use of materials on all pages on the domains Joyofbaking.com, joyofbaking.mobi, the Joyofbaking.com Facebook Page, @joyofbaking on Twitter, the Joyofbaking.com RSS Feed, the Joyofbaking.com email list the Joyofbaking1 YouTube Channel and any emails sent from @joyofbaking.com are entirely at the risk of the user and their owner, iFood Media LLC will not be responsible for any damages directly or indirectly resulting from the use.

References cited may include a link to purchase the referenced book or item on Amazon.com. Joyofbaking.com receives a commission on any purchases resulting from these links.

This website and the contents are not endorsed or sponsored by the owner of the "Joy of Cooking" series of books or its publisher Simon & Schuster, Inc. and is not related to the  "Joy the Baker" books and website. Video icons by Asher.

Content in any form may not be copied or used without written permission of Stephanie Jaworski, Joyofbaking.com.  Students and non profit educators may use content without permission with proper credit. 

A baking resource on the Internet since 1997

Copyright  1997 to 2023 iFood Media LLC