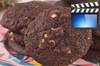
26 Years of Award Winning Baking & Dessert Video Recipes

breakfast & brunch bars & squares cupcakes shortbreads breads youtube channel
about us
recipe index
substitutions
ingredients
glossary
conversions
weight vs volume
easter baking
apple recipes
pumpkin recipes
cranberry recipes
chocolate recipes
healthy baking
eggless recipes
comfort foods
blueberry recipes
biscotti recipes
pudding recipes
english tea party
trifle recipes
ice cream recipes
strawberry recipes
lemon recipes
thanksgiving baking
candy recipes
halloween baking
valentine's baking
christmas cookies
christmas baking
christmas candy
baking history
bibliography

 
Subscribe Now
 

Homemade Pop-Tarts® Recipe & Video

Printer Friendly Page

Pop-Tarts® came onto the market in 1964. And what a novel idea it was. A handheld breakfast food that you could eat on the way out of door. At first Pop-Tarts® consisted of two rectangular pieces of pastry sandwiched together with a filling. They weren't frosted. That came later, in 1967. I remember loving them as a kid, probably because they seemed more like a dessert than the more traditional breakfast foods that I was used to eating. Since they were pre-baked, the idea was to reheat them in your toaster. But I could never bother with that step, I just ate them right out of the package. 

Now, these homemade Pop-Tarts® don't taste exactly like the ones you buy. I think of them more as a handheld pie. And they are delicious. You have two rectangles of buttery pastry, sandwiched together with a tart and tangy raspberry jam (preferably homemade). Of course, the finishing touch is a sugary powdered glaze and colored sprinkles.

Since I like to make all of my Pop-Tarts® the same size, I make a template. This step is actually a time saver, as it makes it so easy to roll out your pastry and then to cut out the individual rectangles. Otherwise I find you're constantly measuring, reshaping, cutting, and re-rolling your pastry.

There are many fillings for Pop-Tarts®. My personal preference is to use my homemade raspberry jam. I really like how the sweet tanginess of the jam combines with the buttery pastry and how it offsets the sweetness of the powdered sugar glaze. Of course, you can use store bought jam, any flavor really, as long as it's nice and thick. Other fillings you can use are Nutella, chocolate ganache, a mixture of light brown sugar (1/2 cup (100 grams)) and ground cinnamon (1 teaspoon), or even a layer of peanut butter and jam.

Related Recipes You May Like

Raspberry Jam

Homemade Hostess® Cupcakes

Homemade Graham Crackers

Granola Bars

Chocolate Rice Krispies Treats®

Rice Krispies Treats®

Homemade Pop-Tarts®: First, to make all the Pop-Tarts® the same size, I like to make a template. Take a piece of parchment paper and draw a rectangle measuring 12 x 9 inches (30 x 23 cm). Then divide the rectangle into 8 - 3 x 4 1/2 inch (7.5 x 11.5 cm) rectangles. (This recipe will give you four Pop-Tarts®.)

Pastry: In your food processor, place the flour, salt, and sugar and process until combined. Add the butter and process until the mixture resembles coarse meal (about 10 seconds). Sprinkle about 2-3 tablespoons of water over the flour mixture and process the dough just until it holds together when pinched. (You don't want a solid ball of dough.) If necessary, add more water. 

Then take your template, turning the parchment paper over so the template is on the bottom, and scatter the pieces of dough within the borders of the 12 x 9 inches (30 x 23 cm) rectangle (See Video for demonstration). Cover with a second piece of parchment and, using the template as a guide, roll the dough to a even thickness. Periodically check the top and bottom sheets of parchment and smooth out any wrinkles. Then slide the pastry, along with the parchment paper, onto a baking sheet and place in the refrigerator until the pastry is firm (about 30 - 60 minutes).

Once chilled, remove from refrigerator and peel off the top piece of parchment paper. Take a pastry wheel, pizza cutter, or sharp knife and cut the pastry into 8 - 3 x 4 1/2 inch (7.5 x 11.5 cm) rectangles, using the template as a guide.
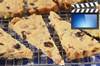
Next, place four of the rectangles of pastry on a parchment paper lined baking sheet. These will be the bottoms of your  Pop-Tarts®. With a pastry brush, brush the outside edges 
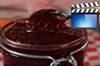
of the rectangles with the beaten egg. Spoon a heaping tablespoon of jam in the center of each rectangle. Place a second rectangle of pastry on top of the first. Use your fingertips to gently press down the edges of the top rectangle of pastry to the bottom pastry. Then, with the floured tines of a fork, seal the edges. Cover and place the baking sheet of unbaked Pop-Tarts® in the refrigerator to chill.

Meanwhile, preheat your oven to 350 degrees F (180 degrees C), with the oven rack in the center position.

Remove the Pop-Tarts® from the refrigerator and brush the tops of the pastry with the egg wash. Using a toothpick or the tines of a fork, prick the tops of the  Pop-Tarts® 
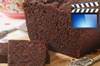
as this will prevent the pastry from puffing up during baking. Bake for about 28-30 minutes or until the Pop-Tarts are nicely browned around the edges. Remove from oven and place on a wire rack to completely cool.

Glaze: While the Pop-Tarts® are cooling, in a small bowl, mix the powdered sugar with the vanilla extract and just enough milk (or cream) to make a smooth and spreadable glaze. Then, using a pastry brush, brush the tops of the cooled pastries with the glaze. If desired, sprinkle with colored sprinkles. Let the  Pop-Tarts® sit at room temperature for about 15-30 minutes to allow the glaze to dry.

The Pop-Tarts® can be stored, in an air tight container, at room temperature, for about 2-3 days, or they can be frozen.

Makes four Pop-Tarts®.

View comments on this recipe on YouTube

Pop-Tarts and Kellogg's are trademarks of Kellogg's NA Co.

Pastry:

1 1/4 cups (175 grams) all-purpose flour

1/2 teaspoon (2 grams) salt

1/2 tablespoon (8 grams) granulated white sugar

1/2 cup (113 grams) cold unsalted butter, diced

3 - 4 tablespoons ice cold water

Egg Wash:

1 large egg, lightly beaten

1/3 cup (80 ml) raspberry jam (or another flavor of jam)

Glaze:

1/2 cup (60 grams) confectioners (powdered or icing) sugar

1-2 tablespoons milk or cream

1/8 teaspoon pure vanilla extract (optional)

Colored Sprinkles (optional)

Subscribe Now


New Videos


Contact Us   Privacy Policy

Use of materials on all pages on the domains Joyofbaking.com, joyofbaking.mobi, the Joyofbaking.com Facebook Page, @joyofbaking on Twitter, the Joyofbaking.com RSS Feed, the Joyofbaking.com email list the Joyofbaking1 YouTube Channel and any emails sent from @joyofbaking.com are entirely at the risk of the user and their owner, iFood Media LLC will not be responsible for any damages directly or indirectly resulting from the use.

References cited may include a link to purchase the referenced book or item on Amazon.com. Joyofbaking.com receives a commission on any purchases resulting from these links.

This website and the contents are not endorsed or sponsored by the owner of the "Joy of Cooking" series of books or its publisher Simon & Schuster, Inc. and is not related to the  "Joy the Baker" books and website. Video icons by Asher.

Content in any form may not be copied or used without written permission of Stephanie Jaworski, Joyofbaking.com.  Students and non profit educators may use content without permission with proper credit. 

A baking resource on the Internet since 1997

Copyright  1997 to 2023 iFood Media LLC