Page loading ... Please wait.
Tested Baking & Dessert Recipes & Videos

breakfast & brunch bars & squares cupcake recipes shortbread recipes comfort foods recipe box
about us
substitutions
ingredients
glossary
conversions
valentine's baking
chocolate recipes
biscotti recipes
candy recipes
cranberry recipes
healthy baking
pudding recipes
quick breads
english tea party
apple recipes
blueberry recipes
lemon recipes
strawberry recipes
pumpkin recipes
trifle recipes
ice cream recipes
halloween baking
thanksgiving baking
christmas cookies
christmas baking
christmas candy
easter baking
baking history
bibliography

Share

Boston Cream Pie Tested Recipe & Video

Printer Friendly Page

There are two questions that immediately come to mind when you hear Boston Cream Pie.  One is "Why is it called a pie?", and the other is "Why the name 'Boston'?". To answer the first question of why "pie" instead of "cake", it is probably because colonists baked their cakes in pie tins as they did not own cake pans. As far as calling it Boston Cream Pie, the story began when a New York newspaper in 1855 published a recipe for a 'Pudding Pie Cake'. This recipe was similar to the Boston Cream Pie recipe of today except that it had a powdered sugar topping. From there we go to Boston where a man named Harvey D. Parker opened a restaurant called the Parker House Restaurant. On the menu was a 'Parker House Chocolate Pie', the recipe to which was similar to the New York newspaper recipe except a chocolate glaze had replaced the powdered sugar topping. We are not sure how it was renamed to 'Boston Cream Pie', but Bo Friberg in his book 'The Professional Pastry Chef' thinks "the name stems from the original title (in the New York paper) combined with the reference to Boston."

For those unfamiliar with this dessert, a Boston Cream Pie has two layers of white sponge or butter cake that are sandwiched together with pastry cream. A chocolate glaze is then poured over the top of the cake and allowed to drip down the sides. For this recipe I have used a sponge cake but you could use your favorite butter cake recipe if you like. The filling, a classic pastry cream (creme patisserie), is a rich, thick, vanilla flavored custard made from a mixture of milk, eggs, sugar, flour and cornstarch (a thickener) cooked on the stove. Its mild taste and creamy texture goes so well with the flavors and textures of both the sponge cake and chocolate glaze. Now, you can make the pastry cream a day or two ahead of time and simply store it in the refrigerator. However, you will need to whisk the cream before using to get rid of any lumps that may have formed. Although there are different types of chocolate glaze that can be used on a Boston Cream Pie, this recipe combines semi-sweet chocolate with cream (really a ganache) and has a deliciously mild chocolate flavor and shiny texture. Once the cake is assembled, let the glaze set for about an hour. This cake is at its best the day it is made. But leftovers can be covered and stored in the refrigerator for a day or two. 

Related Recipes You May Like

Chocolate Layer Cake

 Carrot Cake

Hummingbird Cake

Chocolate Banana Cake

Coconut Cake

Yellow Butter Cake

Pastry Cream: In a medium-sized heatproof bowl, mix the sugar and egg yolks. In another bowl, sift or whisk the flour and cornstarch together and then add to the egg mixture, mixing until you get a smooth paste. 

Meanwhile in a small saucepan, bring the milk just to a boil over medium heat. Pour the milk slowly into the egg mixture, whisking constantly to prevent curdling. (Strain if necessary.) Then place the egg mixture into a medium saucepan and cook over medium heat until boiling, whisking constantly. When it boils, continue to whisk constantly for another minute or so until it becomes thick. Remove from heat and whisk in the vanilla extract. Pour into a clean bowl and immediately cover the surface with plastic wrap to prevent a crust from forming. Let the cream cool in the refrigerator for a few hours.

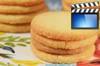
Sponge Cake: Preheat oven to 350 degrees F (177 degrees C) and place rack in center of oven. Butter and line the bottoms of two-8 inch (23 cm) round cake pans with parchment paper. 

While the eggs are still cold separate three of the eggs, placing the yolks in one bowl and the whites in another bowl. To the yolks, add the two remaining eggs. Cover the bowls with plastic wrap and allow the eggs to come to room temperature (about 30 minutes).

Meanwhile, in a bowl whisk together the flours, baking powder, and salt. Place the milk and butter in a small saucepan, over low heat, and warm until the butter melts. Remove from heat, cover, and keep warm.

In your electric mixer, fitted with the paddle attachment, (or with a hand mixer) beat the whole eggs and yolks and 1/2 cup (100 grams) of sugar on high speed until they are thick and fluffy (3-5 minutes) (when you slowly raise the beaters the batter will fall back into the bowl in a slow ribbon). Beat in the vanilla extract. 

In a clean bowl, with the whisk attachment, (or with a hand mixer) beat the egg whites at low speed until foamy. Increase the speed to medium-high and gradually add the remaining sugar, beating until soft, moist peaks form. Gently fold a little of the whites into the batter to lighten it, and then add the rest of the whites folding just until incorporated. Sift half of the flour mixture over the top of the batter and gently fold through with a rubber spatula or whisk. Sift the remaining flour over the batter and fold in.

Make a well in the center of the batter and pour the melted butter/milk mixture into the bowl. Gently but thoroughly fold the butter mixture into the batter. Divide the batter evenly between the two pans and bake for about 18 - 20 minutes or until light brown and springy to the touch. (A toothpick inserted in the middle will come out clean.) Remove from oven and place on a wire rack to cool. Immediately run a spatula around the inside of the pans and then invert the cakes onto a wire rack. Remove parchment paper and re-invert. Cool completely.

Chocolate Glaze: Place the chopped chocolate in a small heatproof bowl. Bring the cream and butter just to a boil in a saucepan over medium heat. Immediately pour the boiling cream over the chocolate and gently stir until chocolate has melted. Set aside until it has thickened to pouring consistency.

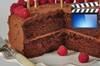
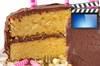
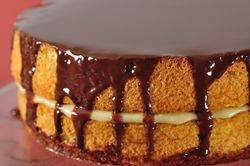
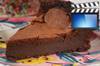
Assemble: Place one cake layer on your serving plate, bottom side facing up. Spoon the pastry cream onto the cake, spreading to make an even layer. Place the second cake layer (top side up) onto the filling. Pour the glaze onto the center of the cake and, using an offset spatula, spread the glaze to the edges of the cake, allowing the glaze to drip down the sides. Let the cake sit until the glaze sets, about one hour. This cake is best eaten the same day it is made. Cover and refrigerate any leftovers.

Serves 8-10

Sources:

Editors of Cook's Illustrated. Baking Illustrated. America's Test Kitchen. Brookline, 2004.

Friberg, Bo. The Professional Pastry Chef (Second Edition). New York: Van Nostrand Reinhold, 1990

Hay, Donna. Modern Classics Book 2. New York: HarperCollins Publishers Inc., 2003.

Mariani, John F. The Dictionary of American Food & Drink, New Haven and New York: Ticknor & Fields, 1983.

Pastry Cream:

1/4 cup (50 grams) granulated white sugar

3 large egg yolks

1/8 cup (20 grams) all-purpose flour

Scant 3 tablespoons (20 grams) cornstarch

1 1/4 cups (300 ml) milk

1 teaspoon vanilla

Sponge Cake:

5 large eggs

3/4 cup (150 grams) granulated white sugar, divided

1/2 teaspoon pure vanilla extract

1/2 cup (60 grams) plain cake flour (not self-rising)

1/4 cup (35 grams) all purpose flour

1 teaspoon baking powder

1/4 teaspoon salt

3 tablespoons milk

2 tablespoons (28 grams) unsalted butter

Chocolate Glaze:

4 ounces (120 grams) semisweet chocolate, finely chopped

1/2 cup (120 ml) heavy whipping cream

1 tablespoon (13 grams) unsalted butter


Share


Join Our New  Recipes & Videos Email List

New Videos


Top 40 Recipes of 2011

1. Red Velvet Cake

2. Vanilla Cupcakes

3. Chocolate Chip Cookies

4. Royal Icing

5. New York Cheesecake

6. Peanut Butter Balls

7. Chocolate Cupcakes

8. Carrot Cake

9. Sugar Cookies

10. Shortbread Cookies

11. Whipped Cream Frosting

12. Red Velvet Cupcakes

13. Ganache 14. Oatmeal Cookies 15. Pound Cake
16. Coconut Macaroons 17. Chocolate Truffles 18. Fruit Tart 19. Pavlova 20. Gingerbread Men
21. Banana Bread 22. Snickerdoodles 23. Apple Pie 24. Meringue Cookies 25. Yellow Butter Cake
26. Apple Crisp 27. Lemon Curd 28. Nanaimo Bars 29. Molten Chocolate Cakes 30. Cream Scones
31. Brownies 32. Rum Balls 33. Biscuits 34. Pumpkin Pie 35. Lemon Bars
36. Mexican Wedding Cakes 37. Melting Moments 38. Boston Cream Pie 39. Chocolate Crinkles 40. Butter Tarts


Contact Us   Privacy Policy Follow Joyofbaking On Twitter Stephanie Jaworski+

Use of materials on all pages on the domains Joyofbaking.com, joyofbaking.mobi, the Joyofbaking.com Facebook Page, @joyofbaking on Twitter, the Joyofbaking.com RSS Feed, the Joyofbaking.com email list the Joyofbaking1 YouTube Channel and any emails sent from @joyofbaking.com are entirely at the risk of the user and their owner, iFood Media LLC will not be responsible for any damages directly or indirectly resulting from the use.

This website and the contents are not endorsed or sponsored by the owner of the "Joy of Cooking" series of books or its publisher Simon & Schuster, Inc. Video icons by Asher.

Content in any form may not be copied or used without written permission of Stephanie Jaworski, Joyofbaking.com.  Students and non profit educators may use content without permission with proper credit. 

A baking resource on the Internet since 1997

Copyright  1997 to 2012 iFood Media LLC