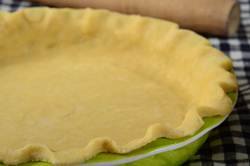
This Pie Crust recipe, also known as Pate Brisee (pronounced paht bree-ZAY),
produces a deliciously rich and buttery flavored pastry with a crisp and flaky
texture. Well wrapped, it can be stored in the refrigerator for several days or
frozen for over a month. I love its versatility, as it is ideal for
both sweet and savory pies and tarts.
While this
Pie Crust can be made by hand, I like to use a food
processor.
Try to use a high quality unsalted butter, as
it contains less water than the lower quality brands. To start, place the flour,
salt, and sugar in your food processor and process until the ingredients are
combined. Then evenly distribute the cold butter,
that has been cut into small pieces, over top of the flour mixture. Use the
pulse button to process the butter into the flour until the mixture is crumbly,
that is, until it resembles coarse meal (about 15 seconds). (Do not worry if you
have a few large pieces of butter in the flour.) (Now, if you
over process the
butter into the flour, it will cause the butter to coat the flour, which means
it will not absorb enough water, causing a fragile dough that breaks apart. On
the other hand, if you under process
the butter into the flour, too much water is needed to bind the ingredients
together, which results in a tough pastry because too much gluten has formed.) Next, the
ice cold water is added. I like to
start by sprinkling about 1/4 cup (60 ml) of the ice water over the flour
mixture. Then use the Pulse Button and process just until the
pastry starts to come together in clumps. You do not want it to be a solid ball
of dough. Add a little more liquid (up
to another 1/4 cup (60 ml) if the dough is dry or doesn't hold together when you
press a little of the pastry between your thumb and index finger. Once made,
take the clumps of pastry from your food processor and place them on your
countertop. Then gather them into a ball, divide the dough in half, and flatten
each half into about a 5 inch (12 cm) round. Wrap each half in plastic wrap or
wax paper and refrigerate until firm, about an hour, or even overnight. This
chilling allows the gluten in the flour to relax and the butter to firm up so
the pastry will be easy to roll out, won't stick to the counter, and reduces
shrinking of the pastry as it bakes. It also gives the pastry that lovely crisp
and crumbly texture. This pie crust dough can also be frozen for about a month.
Defrost frozen dough in the refrigerator for several hours, or even overnight.
Once the Pie Crust dough has been chilled so it is firm enough to roll out,
remove one half from the refrigerator, and place it on a lightly floured
counter. Now, if you find the dough is very firm, let it rest for a bit to
soften it enough that it rolls out easily. Of course, the tricky part is knowing
what the right temperature is for rolling out the pastry. Because in order for
it to roll out smoothly, without it sticking to the counter or tearing, it has
to be at the right temperature. Too cold (it will tear), too warm (it will
stick). This "feel" for the dough will come with practice, so don't get
discouraged if you have some trouble at first. If the rolled out pastry tears a
little, don't worry, just patch it back together as best as you can. Always
lightly flour your countertop, rolling pin, and top of dough. Always roll the
pastry from the center outwards, turning the pastry every so often, to ensure it
is not sticking and is of even thickness. Also, as you roll try to keep the
dough in a round shape, but don't worry if the edges are a little ragged as they
will be trimmed. When the dough is the desired size and thickness (about 1/8
inch), gently roll the round of pastry loosely around your rolling pin and then
unroll it on top of your pie pan. Gently press the pastry onto the bottom and up
the sides of your pan, making sure it is pressed into the edges of pan. Also,
try not to stretch the pastry as this will cause shrinkage during baking. Trim
the edges. If you can, chill the unbaked pie crust before filling and baking as
this, again, will help prevent shrinkage during baking. Your Pie Crust is now
ready to use.
Pie Crust: In a food processor, place the flour, salt, and sugar and process
until combined. Add the butter and process, using the pulse button, until the mixture
is crumbly (resembles coarse
meal) (about 15 seconds). Pour 1/4 cup (60 ml) of ice water in a slow, steady stream,
through the feed tube until the dough starts to clump together when pinched (it
should not be a solid ball of dough). Add
remaining water, if necessary. Do not process more than about 30 seconds.
Turn the dough out onto your work surface
and gather it into a ball. Divide the dough into two equal pieces,
flatten each portion into a 5 inch (12 cm) disk, cover with plastic wrap, and refrigerate for
30 - 60 minutes, or until firm enough to roll out. (This
will chill the butter and allow the gluten in the flour to relax.) At this
point you can also freeze the dough for about a month. Defrost the dough in the
refrigerator for several hours or even overnight before using.
For each disk of pastry,
on a lightly floured surface, roll out the pastry to fit into a 8 or 9 inch (20
to 23 cm) pie pan. To prevent
the pastry from sticking to the counter and to ensure uniform thickness, keep
lifting up and turning the pastry a quarter turn as you roll (always roll from
the center of the pastry outwards to get uniform thickness). To make sure it is
the right size, take your pie pan, flip it over, and place it on the rolled out
pastry. The pastry should be about 2 inches (5 cm) larger than your pan.
When the pastry is rolled to
the desired size, lightly roll pastry around your
rolling pin, dusting off any excess flour as you roll. Unroll onto the top of
your pie pan. Never pull the pastry or you will get shrinkage (shrinkage is caused by too
much pulling of the pastry when placing it in the pan). Gently lay in pan and with a small
floured piece of pastry or with your fingertips, lightly press the pastry onto
the bottom and up the sides of the pan. Flute the edges of the pastry or use the
tines of a fork to seal the pastry. If possible, chill the pie crust before
filling and baking. The pastry is now ready to use.
Makes two - 9 inch (23 cm) pie
crusts. Preparation time 30 minutes.
Use of materials on
all pages on the domains Joyofbaking.com,
the Joyofbaking.com Facebook
Page, the
Joyofbaking1 YouTube
Channel and any emails sent from @joyofbaking.com
are
entirely at the risk of the user and their owner, iFood Media LLC
will not be responsible for any damages directly or indirectly resulting
from the use.
References
cited may include a link to purchase the referenced book or item on Amazon.com.
Joyofbaking.com receives a commission on any purchases resulting from these
links.
This
website and the contents are not endorsed or sponsored by the owner of the
"Joy of Cooking" series of books or its publisher Simon & Schuster, Inc.
and is not related to the "Joy the Baker" books and website.
Video icons by Asher.
Content in any form may
not be copied or used without written permission of Stephanie Jaworski,
Joyofbaking.com. Students and non profit educators may use content without
permission with proper credit.


