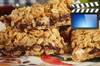
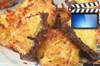
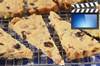
These Fruit and Nut Bars
are decidedly different from the other bars and squares on the site. Crisp and
chewy in texture, they are full of dried fruits and nuts, that are held
together with a batter that contains no butter or oil, just one beaten egg. These make a healthy to-go
breakfast, a great snack to pack in lunchboxes, or they would be perfect to take along on your next picnic or hike. The added bonus is that they will keep for
several weeks when stored in the refrigerator.
This Fruit and Nut Bar recipe
was based on a recipe I found in Alice Medrich's excellent book 'Cookies and Brownies'. Now, don't feel you have to follow this recipe
exactly, as you can vary the dried fruits and even the nuts as per your own
preferences. Just keep the amounts the same; that is, a total of 2 cups (270 grams) of dried
fruits and a total of 1 1/2 cups (175 grams) of nuts (you can use one type of nut or
a combination of several types). Dried fruits have come a long way in recent years in both availability and
quality. We are no longer limited to just dried dates and raisins. Today we
are offered apricots, mango, papays, apples, pears, cherries,
cranberries, strawberries, and even blueberries and raspberries. But there are a few things to keep in mind when buying dried
fruits. First, try to buy in bulk from a grocery store or natural food
store that has a high turnover. Not only will the fruit be fresher, but you
can see, smell, feel, and often taste the fruit to make sure it is
fresh and of high quality. Pre-packaged fruit can also be excellent but it
is harder to tell the quality of the fruit through the plastic bag. Make
sure to check the expiration date on the bag. Always
look for dried fruit that is plump, moist, and has good color. Never buy
fruit that is shrivelled and dried out or moldy. There is a debate about whether to
buy 'sulphured' or 'unsulphured' dried fruits. Some like to buy 'sulphured'
which means that it has been treated with a sulphur dioxide solution. This
preserves the fruit's bright color and makes the fruit very soft and moist. The downside is
that some people can taste the preservative while others are allergic. Of
course, 'unsulphured' means it has not been treated before it is dried and
some say the flavor of untreated dried fruits is far superior. The downside is
that the fruit's color may be slightly faded looking, especially
dried fruits (like apples, pears, and bananas) that oxidize
quickly.
Fruit
and Nut Bars: Preheat your oven to 325 degrees F (160
degrees C) and place the rack in the center of the oven. Have
ready an 8 inch (20
cm) square baking pan that has been lined across the bottom and up the two
opposite sides with foil.
In a large bowl,
combine the chopped nuts with the dried fruits and chocolate chips. Then add the flour, baking soda, salt,
and sugar and stir until all the fruit and nuts are completely coated with the flour mixture.
Make sure to separate any clumps of dried fruits.
In a separate
bowl, beat (with a wire whisk or hand mixer) the egg and vanilla until light
colored and thick (this will take several minutes). Add the egg mixture to the
fruit and nut mixture and mix until all the fruit and nut pieces are completely coated with
the batter. Evenly spread into your prepared pan, pressing to compact the batter.
Bake for about 35
to 40 minutes, or until the batter is golden brown and
is just starting to pull away from the
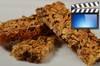
sides of the pan. Remove from oven and place on a wire rack to cool. Then lift
the bars from the pan using the edges of the foil. Use a sharp knife to cut into
squares or bars.
Can be stored for
about 10 days at room temperature or longer if refrigerated.
Use of materials on
all pages on the domains Joyofbaking.com,
the Joyofbaking.com Facebook
Page, the
Joyofbaking1 YouTube
Channel and any emails sent from @joyofbaking.com
are
entirely at the risk of the user and their owner, iFood Media LLC
will not be responsible for any damages directly or indirectly resulting
from the use.
References
cited may include a link to purchase the referenced book or item on Amazon.com.
Joyofbaking.com receives a commission on any purchases resulting from these
links.
This
website and the contents are not endorsed or sponsored by the owner of the
"Joy of Cooking" series of books or its publisher Simon & Schuster, Inc.
and is not related to the "Joy the Baker" books and website.
Video icons by Asher.
Content in any form may
not be copied or used without written permission of Stephanie Jaworski,
Joyofbaking.com. Students and non profit educators may use content without
permission with proper credit.