|
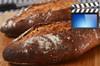
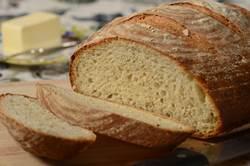
French Country Bread:
In a large bowl combine the flours, yeast, malt powder, and salt. Make a well in the center of the dry ingredients and pour in the water.
(For the formula for calculating water temperature see Headnote). With a
bowl scraper or wooden spoon, gradually work the flour into the liquid.
Then using your bench scraper or knife, cut a piece of the dough from the edge and then
place it on top of the dough. Turn your bowl and cut off another small chunk of
dough and place it on top of the dough. Keep turning your bowl, and cutting off
chunks of dough, stacking it on top, until all the flour has been moistened.
(The object is just to moisten all the flour. You don't want to knead the
dough.)
Then, using an unflavored oil
(corn, vegetable, canola, safflower oil) lightly oil a large bowl.
Place the dough into the bowl and then flip it over so the top of the dough has
a light coating of oil. Cover with plastic wrap and let it sit (ferment) at room
temperature for three hours. Every 45 minutes you need to 'stretch and fold' the dough
(see video for technique) to
strength and equalize its temperature.
To stretch the dough, gently
take one edge of the dough and stretch it and then fold it onto the top of the
dough.
Turn your bowl 180 degrees and stretch the dough in the same way. Then turn your
bowl a quarter turn (90 degrees) and stretch the dough in the same way. Then
turn your bowl 180 degrees and repeat the process. After that flip your dough so
the bottom is now the top, and cover. Repeat the process in 45 minutes and again
45 minutes later. (So this following step needs to be done a total of three
times over three hours.)
Once the dough has fermented
for three hours, it's time to preshape our dough. Turn out your dough onto a
lightly floured surface. You want the top of the dough to now be on the bottom.
Lightly flour the top of your dough and with the palms of your hands flatten the
dough slightly to break any large air bubbles.
Take the dough
and, on a lightly floured surface, pat into a 6 x 4 inch (15 x 10 cm) rectangle.
Fold over the top third of dough (like you're folding a letter) and
gently seal (this also increases the surface tension of the dough.)
Then take the top of the dough and fold it to the bottom edge of the dough and
seal. Place the palms of your hand on the top of the dough and gently roll it
back and forth to seal the dough and create tension. Place the log of dough
(seam side down) onto a lightly floured baking sheet or wooden cutting board. Then cover with plastic wrap and let proof
(ferment) (and to relax the dough) for about 30 minutes at room temperature.
After 30 minutes, place the dough
(top side down) onto a lightly floured surface. Gently pat the dough into a
round, breaking any large air bubbles. Gently fold the edges of the dough into
the center and seal the dough. Turn the dough over so the seams are on the
bottom. Cup your hands around the top of the dough furthest from you and gently
pull the dough towards you to create tension. Turn and repeat this process
around the whole ball of dough. Then, cup your hands around the ball of dough,
and gently rotate the dough in a circular motion until it forms a nice tight
round. Place the round of dough, top side down, in a floured
10 inch
(25 cm) bread rising basket. Loosely cover the top of the basket with plastic wrap
and let proof for about two hours at room temperature, or until risen and when you lightly press a
finger into the dough, it will leave a slight indentation.
At least one to one and a
quarter hours
before baking your bread, preheat your oven to 450
degrees F (230 degrees C). (If possible, don't use the fan
(convection) setting on your oven.) Have your oven racks in the top and bottom third of
your oven. On each rack have a
pizza stone. Also, place a cast iron frying pan
on the floor of your oven (we will be placing ice cubes in the frying pan to
create steam).
Have ready a
pizza paddle that
has been lightly sprinkled with fine cornmeal or semolina. Gently turn the bread
out of the basket onto your pizza paddle. Then with a
razor or
sharp knife, score the top of the round with 3 - 4 inch (10 cm) long cuts that
are about 1/2 inch (1 cm) deep. Transfer the
bread onto the hot pizza stone. Quickly place about four ice cubes into the hot cast iron
frying pan (this creates steam). Bake the bread for about 30
to 35
minutes or
until golden brown.
(If you tap the bottom of the bread it will sound hollow.) Remove from oven and
place on a wire rack to cool for about one hour.
Makes one -
10
inch (25 cm) round bread.
View comments on this recipe on YouTube |