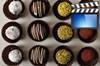
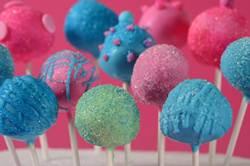
One look at a Cake Pop and you know why they are so
popular. Small and oh so cute, the mixing of cake crumbs with frosting
into rounds, and then covering them with a delightfully crisp outer shell of
colorful candy coating, makes for a very
sweet confection. What I love about cake pops is how creative you can be. Once dipped, you can cover them with
candy sprinkles, sanding or sparkling sugar, edible pearls or glitter,
chocolate jimmies, finely chopped nuts, crushed cookies, dried coconut, or
even your favorite crushed candy. Kids love them as do adults, and for a
party they
make a unique centerpiece or a nice party favor.
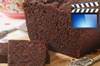
Cake Pops can be made with just about any type of cake and any
flavor of frosting. Although a lot of recipes use a cake mix and a can of
premade frosting, I think if you're going to do all this work to make
cake pops, why not
use homemade. So for this recipe I decided to make the
Vanilla Cake and 1/2 the recipe for the
Vanilla Frosting recipe. The
great thing about these pops is that you can make them in steps, over
several days. For example you can make the cake and frosting the day
before you assemble the cake balls. And once made, the cake balls can be
refrigerated 3-4 days before dipping in the candy coating. So the steps are -
bake the cake, make the
frosting, crumble the cake, combine frosting and cake crumbs, roll into balls, refrigerate
until firm, melt candy coating, insert sticks and dip cake balls in
coating,
decorate, let dry.
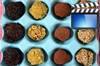
A few notes on ingredients. Candy coating is
also known as candy melts, candy wafers, confectionery coating, compound
coating, bark coating, candy chocolate, or summer
coating. It's made from a mixture of sugar, milk solids, vegetable oils,
flavoring, and coloring, and I think it tastes a lot like sweet white chocolate.
You can also get chocolate flavored, peanut butter, and chocolate mint flavored
candy coating. You can store the candy coating in a cool dry place,
usually up to 18 months. But do not refrigerate. Candy coating is sold at cake decorating, craft stores or
online,
and the two brands I normally use are Merckens and Wilton.
What is so nice about this product is how easy it is to work with, its
wide range of colors and flavors, and how it dries to a hard crisp outer
shell, similar in texture to tempered chocolate.
I normally add a little flavorless oil, shortening, or paramount crystals
(made from palm kernel oil, lecithin, and citric acid) to the melted candy
coating to make it smooth and fluid, so you get a nice, not too thick,
candy coating on the cake balls. For the cake pops you will need about 55
- 4 1/2 inch (11 cm) long cake pop sticks (known as lollipop or sucker
sticks) to insert into your cake balls. And you will also need a large thick piece of
styrofoam (or florist's foam) for drying the cake balls (also makes a
nice centerpiece). It can also be found at cake decorating or craft stores.
Once the cake pops have dried and if you want to give them as party
flavors, I like to cover each cake pop with a small cellophane party bag
and tie the end with a twist tie or ribbon.
Cake Pops:
Bake the Vanilla Cake and let it cool completely. Make the
frosting. Then, in
a large bowl, crumble the cake into small crumbs (you can
do this step by hand or in the food processor). If desired, using a sharp knife,
cut the crusts off the cake layers.
Using your hands or a large spoon, stir in just
enough frosting (2/3 - 1 cup (160 -240 ml)) to hold the mixture
together. If you add too much frosting the cake balls will be soggy. Too little
frosting and the cake balls will fall apart, especially when dipped. So add the
frosting gradually and really work into into the cake crumbs, as the amount you need totally depends on the type and
texture of your cake.
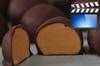
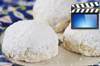
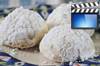
Roll the mixture into golf ball sized rounds
(1 1/2 inch (4 cm) or 1 ounce (25 grams)). I find this is a good cake-to-candy-coating
ratio. Place the cake balls on a parchment or wax paper lined baking sheet.
After forming the cake balls, cover the baking sheet with plastic wrap and place in the refrigerator until
they are firm, but not frozen (about 1-2 hours). At this point, you can store
the cake balls in the refrigerator for 2-3 days before dipping in the candy
melts or the unfrosted cake balls can be frozen for a couple of months. Defrost
the balls in the refrigerator overnight before dipping in the candy melt, because if the cake balls are frozen
and you dip them in the warm candy melts, you may find that the candy
coating cracks after it dries. That is because as the frozen cake balls defrost,
they expand, causing the coating to crack.
Once the cake balls are cold, it is time melt
the candy coating. I like to melt 16 ounces (450 grams) of the candy melts at
a time. You can do this in the microwave or in a heatproof
bowl placed over a saucepan of simmering water. If using the microwave, place
the candy melts in a microwaveable bowl and heat on medium for about 1 minute.
Stir and continue to heat on medium, at 20 second intervals, until the candy
melts evenly. If the melted candy is too thick, gradually stir in about 1/2 - 1
tablespoon flavorless oil or shortening or 1 teaspoon paramount crystals into the melted candy coating
until smooth and fluid. You want it to flow easily from your spoon. (This prevents the
candy coating from being too thick, which makes the cake balls hard to dip and
may cause cracking.) At this point you may want to transfer the melted candy
coating to a small deep bowl so when dipping the cake pops they can be
completely submerged.
Remove the cake balls from the refrigerator
and one by one, dip the sticks about 1/2 inch (1 cm) into the melted candy and
then insert about halfway into the cold cake balls (the melted candy acts like a
glue). Don't insert the sticks all the way through the cake balls or they will
crack.Before you starting dipping the cake balls have a large thick block of
styrofoam (or florist's foam) on hand to stick the cake pops in for drying.
Then, one by one, dip the cake pops straight
down into
the melted candy coating. Dip, don't roll, the pops completely into the
coating. Rolling can cause crumbs to get into the coating, which we don't
want. Then lift the cake pops out of the coating and let the excess coating run
off, turning the pop so you get an even coating of candy. You can also very very
gently tap the stick on the side of the bowl to help with this. If there are
bubbles, burst them gently with the end of a toothpick. At this point you can
sprinkle the still wet candy coating with candy sprinkles, sanding or sparkling
sugar, edible pearls or glitter, chocolate jimmies, finely chopped nuts, crushed
cookies, dried coconut, or even crushed candy. The cake pops need to dry
upright, so gently insert the end of the stick into the styrofoam and let dry.
If you find some of the candy coating has dripped down the lollipop sticks, use
your fingertips to wipe it off. (This can happen if you don't let the excess
coating run off the cake pop, if the candy coating was a little too hot for
dipping, or if it was a little too thin or too thick.) Once
the cake pops are dry, you can use attach edible decorations to the pops. Using
a toothpick, dab a little of the melted coating on the decoration and gently attach it
to the cake pops. Or, if you like, you can take some of the melted candy
coating, place it into a piping bag fitted with a small plain tip, and pipe lines or shapes on the cake
pops. Once dry, the cake pops can be covered and stored, at room temperature or
in the refrigerator, for about 3-4 days.
Makes about 55 - 1 1/2 inch (4 cm) cake pops.
Preparation time 1 hour.
Use of materials on
all pages on the domains Joyofbaking.com,
the Joyofbaking.com Facebook
Page, the
Joyofbaking1 YouTube
Channel and any emails sent from @joyofbaking.com
are
entirely at the risk of the user and their owner, iFood Media LLC
will not be responsible for any damages directly or indirectly resulting
from the use.
References
cited may include a link to purchase the referenced book or item on Amazon.com.
Joyofbaking.com receives a commission on any purchases resulting from these
links.
This
website and the contents are not endorsed or sponsored by the owner of the
"Joy of Cooking" series of books or its publisher Simon & Schuster, Inc.
and is not related to the "Joy the Baker" books and website.
Video icons by Asher.
Content in any form may
not be copied or used without written permission of Stephanie Jaworski,
Joyofbaking.com. Students and non profit educators may use content without
permission with proper credit.