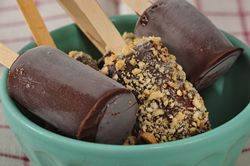
26 Years of Award Winning Baking & Dessert Video Recipes

breakfast & brunch bars & squares cupcakes shortbreads breads youtube channel
about us
recipe index
substitutions
ingredients
glossary
conversions
weight vs volume
easter baking
apple recipes
pumpkin recipes
cranberry recipes
chocolate recipes
healthy baking
eggless recipes
comfort foods
blueberry recipes
biscotti recipes
pudding recipes
english tea party
trifle recipes
ice cream recipes
strawberry recipes
lemon recipes
thanksgiving baking
candy recipes
halloween baking
valentine's baking
christmas cookies
christmas baking
christmas candy
baking history
bibliography

 
Subscribe Now
 

Frozen Chocolate Banana Pops Recipe & Video

Printer Friendly Page

Frozen Chocolate Banana Pops are for the kid in us all. It's hard to resist the sweet flavor of a frozen banana enrobed in a thin coating of shiny dark chocolate. Eat them plain or roll them in chopped nuts, toasted coconut, granola or even candied sprinkles. A perfect frozen treat on a hot summer's day.

To make Frozen Chocolate Banana Pops you will need: ripe bananas that are still firm, some kind of stick or skewer (popsicle sticks, cookie or cake pop sticks, bamboo skewers, or even chopsticks) to insert into the bananas, good quality semi sweet or bittersweet chocolate, and a little flavorless oil (vegetable, canola, corn, safflower or a light olive oil) or even coconut oil. Chopped nuts, toasted coconut, candy sprinkles or chocolate jimmies are entirely optional. These are not difficult to make. The first step is to freeze the bananas for about 15-30 minutes before dipping them into the melted chocolate. But don't cover them with plastic wrap as we don't want moisture to form on the bananas as they freeze. We add a little flavorless oil to the melted chocolate because it lowers the chocolate's viscosity which prevents the chocolate from forming too thick of a coating on the banana. While you can eat the chocolate banana pops right away, the bananas will still be a little soft. So I like to place them in the freezer for at least 30 minutes before serving. Covered, they will keep in the freezer for about a week. If they have been stored in the freezer overnight, I find it best to put them in the refrigerator for at least 30 minutes before serving so the frozen banana softens a little.

Related Recipes You May Like

Watermelon Bombe

Orange Ice Cream

Vanilla Ice Cream

Strawberry Sherbet

Chocolate Ice Cream

Frozen Fruit Pops

Frozen Chocolate Banana Pops: Line a baking sheet with parchment paper, wax paper, or aluminum foil.

Cut the bananas into 2 - 3 inch (5 - 7 cm) chunks. Insert a cookie stick, popsicle stick, bamboo skewer, or a chopstick into the pieces of banana. Place on the baking sheet and freeze for about 15 - 30 minutes.

Meanwhile, melt the chocolate and flavorless oil in a heatproof bowl placed over a saucepan of simmering water.
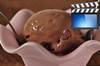
Then remove the bananas from the freezer and, taking one banana at a time, dip into the melted chocolate, making sure the banana is completely covered with chocolate. If desired, roll (or sprinkle) the chocolate coated banana 
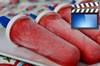
in chopped nuts, toasted coconut, granola, or colored sprinkles. The chocolate covered bananas can be eaten right away (although the banana will still be quite soft) or place them back on the baking sheet and freeze.

Once completely frozen, the bananas can be stored in a covered container, for about one week. To soften the bananas, place in the refrigerator for at least 30 minutes before serving.

Makes about 9 - 2 inch (5 cm) frozen chocolate banana pops. Preparation time 30 minutes.

View comments on this recipe on YouTube

Frozen Chocolate Banana Pops:

4 ounces (115 grams) semi-sweet or bittersweet chocolate, chopped

1 tablespoon flavorless oil (corn, vegetable, canola, safflower or a light olive oil) (can also use coconut oil)

3 large ripe bananas

Garnish:

Chopped peanuts, pecans, hazelnuts, almonds, walnuts or pistachios

Toasted dried coconut

Granola

Sprinkles or Chocolate Jimmies

Note: To toast coconut, place in a 300 degree F (150 degrees C) oven and bake for about 5 minutes or until lightly browned. Watch carefully.

Subscribe Now


New Videos


Contact Us   Privacy Policy

Use of materials on all pages on the domains Joyofbaking.com, joyofbaking.mobi, the Joyofbaking.com Facebook Page, @joyofbaking on Twitter, the Joyofbaking.com RSS Feed, the Joyofbaking.com email list the Joyofbaking1 YouTube Channel and any emails sent from @joyofbaking.com are entirely at the risk of the user and their owner, iFood Media LLC will not be responsible for any damages directly or indirectly resulting from the use.

References cited may include a link to purchase the referenced book or item on Amazon.com. Joyofbaking.com receives a commission on any purchases resulting from these links.

This website and the contents are not endorsed or sponsored by the owner of the "Joy of Cooking" series of books or its publisher Simon & Schuster, Inc. and is not related to the  "Joy the Baker" books and website. Video icons by Asher.

Content in any form may not be copied or used without written permission of Stephanie Jaworski, Joyofbaking.com.  Students and non profit educators may use content without permission with proper credit. 

A baking resource on the Internet since 1997

Copyright  1997 to 2023 iFood Media LLC