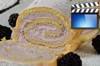
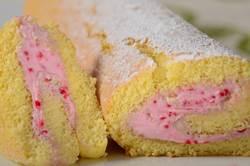
A Jelly Roll is defined as a thin sheet of sponge cake that is spread with a
layer of jam or jelly and then rolled up. Normally it's decorated very simply,
that is, with just a sprinkling of powdered sugar. When you cut the Jelly Roll
crosswise, each slice has a pretty pinwheel design. This type of cake has been
around since the mid 1800's and goes by many names. Depending on where you live you may
know this cake as a Jelly Roll, a Sponge Roll, a Cake Roll, a Roulade, or even a Swiss Roll.
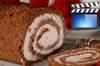
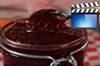
As the name "Jelly" Roll implies, traditionally it's filled with a jelly,
a jam, or
a fruit preserve. However, you can use other fillings. My personal
favorite, used here, is a whipped cream that's flavored with raspberry jam.
But you could try filling the sponge cake with
lemon curd, chocolate ganache,
dulce de leche, a buttercream, a
pastry cream, or even nutella.
I was taught how to make a Jelly Roll in Home
Economics class in Junior High School. In fact, this recipe is from my
Home Economics cookbook. I love how it tastes, how it looks, and how
easy it is to make. It uses just six basic
ingredients (eggs, sugar, vanilla extract, flour, baking powder, and salt) that you probably already have in your pantry.
Now, it's important
to have your eggs at room temperature so when they're beaten with the
sugar they reach their full volume. Once that is done all you need to do
is sift the flour over the top of the batter and fold it in. I have used
cake flour as it's a low gluten flour that gives the sponge cake a soft
and tender crumb. If you cannot find cake flour where you live, then you
can make your own. If measuring by volume, then the easiest thing to do is
to take 3/4 cup all purpose flour, remove 1 1/2 tablespoons and replace it
with 1 1/2 tablespoons cornstarch. Now, if you are making the
cake flour using weight measurments then for
3/4 cup (90 grams) of cake flour whisk or sift together 75 grams of all
purpose flour and 15 grams cornstarch.
Sponge Cake: Preheat
your oven to 400
degrees F (200 degrees C) and place your oven rack in the center of the oven. Butter,
or spray with a nonstick vegetable spray, a 15 x 10 inch (38 x 25 cm) baking pan,
line it with parchment paper, and then butter and flour the paper (or spray with
a nonstick vegetable/flour spray).
In a small bowl, sift or whisk
the flour with the baking powder and salt.
Place the eggs, sugar,
and vanilla extract in the bowl of your electric mixer, fitted with the paddle attachment
(can also use a hand mixer). Beat on high speed until the mixture is thick and fluffy
and
pale yellow in color (this will take about five to ten minutes). (When you
slowly raise the beater the batter will fall back into the bowl in a slow
ribbon.) Then sift about
half the flour mixture over the egg mixture and fold in gently with a rubber spatula, just
until the flour is incorporated. Sift the remaining flour over the
batter and fold in.
(Don't over mix or the batter will deflate.) Pour the batter into
your prepared pan,
spreading evenly with the back of a spoon or an offset spatula.
Bake for
about 10 minutes or
until golden brown and when pressed lightly, it springs back.
Immediately upon
removing the cake from the oven sprinkle the top of the cake with a light
dusting of powdered sugar. Then invert the cake onto a clean dish towel.
Gently remove the parchment paper, sprinkle the top of the cake lightly with powdered sugar, and roll
up the sponge, with the towel. Place on a wire rack to cool completely.
Raspberry Whipped Cream: Place the whipping cream and sugar into the bowl
of your electric mixer, fitted with the whisk attachment (or with a
hand mixer) and beat until soft peaks form.
Add the raspberry jam and beat just until stiff peaks form.
To
Assemble: Unroll the sponge, spread with the
cream and reroll. You can serve immediately or cover and store in the refrigerator. If
you like, you can dust the top of the Jelly Roll with powdered sugar
before serving.
Use of materials on
all pages on the domains Joyofbaking.com,
the Joyofbaking.com Facebook
Page, the
Joyofbaking1 YouTube
Channel and any emails sent from @joyofbaking.com
are
entirely at the risk of the user and their owner, iFood Media LLC
will not be responsible for any damages directly or indirectly resulting
from the use.
References
cited may include a link to purchase the referenced book or item on Amazon.com.
Joyofbaking.com receives a commission on any purchases resulting from these
links.
This
website and the contents are not endorsed or sponsored by the owner of the
"Joy of Cooking" series of books or its publisher Simon & Schuster, Inc.
and is not related to the "Joy the Baker" books and website.
Video icons by Asher.
Content in any form may
not be copied or used without written permission of Stephanie Jaworski,
Joyofbaking.com. Students and non profit educators may use content without
permission with proper credit.