Tested Baking & Dessert Recipes & Videos

breakfast & brunch bars & squares cupcake recipes shortbread recipes comfort foods youtube channel
about us
substitutions
ingredients
glossary
conversions
weight vs volume
chocolate recipes
apple recipes
pumpkin recipes
biscotti recipes
candy recipes
cranberry recipes
healthy baking
pudding recipes
quick breads
english tea party
blueberry recipes
lemon recipes
strawberry recipes
trifle recipes
ice cream recipes
halloween baking
thanksgiving baking
christmas cookies
christmas baking
christmas candy
valentine's baking
easter baking
baking history
bibliography


Join Our New  Recipes & Videos Email List

Caramels Tested Recipe

Printer Friendly Page

Caramels Recipe

This recipe produces a soft and chewy Caramel with a smooth and creamy texture. Very few ingredients are needed, just heavy cream, brown and white sugars, kosher salt, and pure vanilla extract. You can cut the caramel into any size or shape you like. I like either small squares or long thin strips that I wrap in wax paper, twisting the ends to keep the Caramels fresh. Homemade Caramels are perfect for gift giving or you may want to make a batch or two for your next bake sale. This Caramel recipe is adapted from a wonderful book called "Baking From The Heart" by Michael J. Rosen.   


I know I am repeating myself, so if you have read the head note for the Maple Pecan Caramels, you can skip this part and go straight to the recipe. Caramels are about boiling white and brown sugars, along with some heavy cream, and with that comes the problem of sugar crystallization. Luckily there are a few precautions you can take to help prevent this from happening. But first, let's talk about equipment and that you should never make candy on a humid day unless you have adequate air conditioning. The equipment; it is important to use a heavy duty saucepan so the candy will not scorch under high temperatures. Be sure to use a wooden spoon to stir the syrup as the sugar crystals will not stick to wood as easily as they will to metal. And most importantly, buy a good mercury candy thermometer with a metal clip so you can fasten it to the side of the pan. When using a candy thermometer make sure the bulb of the thermometer does not rest on the bottom of the pan as this can cause an inaccurate temperature reading. It is also important to read the temperature at eye level and you may have to wipe the steam off the thermometer first in order to read the numbers. If you think your candy thermometer may be inaccurate, you can test its' accuracy by placing it in a saucepan of boiling water. The temperature should read 212 degrees F (100 degrees C). If you find your thermometer is off by a degree or two, simply adjust your recipe to take this into account. Another thing about candy thermometers are that they are fragile so after each use place in hot water (not cold) to dissolve the sugar coating. Never place a hot thermometer into cold water as this can cause it to break. And be sure to store your thermometer away from other kitchen utensils so it won't get banged around. Lastly, cleaning the saucepan can be a problem. The best way to remove all that hard caramelized sugar is to fill the saucepan with water and bring it to a boil. Turn off the heat and let it sit until the sugar dissolves.

Now, the important part. To prevent sugar crystallization, which means your caramels will have a grainy texture, make sure to stir the ingredients constantly until they reach the boiling point. (This ensures that the sugars have completely melted.) Brush down the sides of the pan, with a heatproof pastry brush that has been dipped in warm water, to remove any sugar crystals that may have formed on the sides of the saucepan. Clamp a candy thermometer to the side of the saucepan. Do not stir the boiling syrup, just brush down the sides of the pan, with a heatproof pastry brush that has been dipped in warm water, to remove any sugar crystals that may have formed on the sides of the saucepan. Watch the caramel closely and remove from heat once it reaches 245 degrees F or 118 degrees C. Stir in the vanilla extract and pour into your prepared pan. Let it cool undisturbed, at room temperature, for about eight hours or until set. Then cut into squares or rectangles. Caramels can be stored in an airtight container at room temperature.

Related Recipes You May Like

Peppermint Patties

Peanut Butter Balls

Peppermint Bark

Maple Pecan Caramels

 Turtle Brownies

Chocolate Peanut Squares

Caramels: Butter an 8 x 8 inch (20 x 20 cm) baking pan.

In a heavy medium sized saucepan, stir together the cream, sugars, and salt. Place the saucepan over medium high heat and bring to a boil, stirring constantly with a wooden spoon. Once the mixture boils, with a heatproof pastry brush that has been dipped in warm water, wash down the sides of the saucepan to remove any sugar crystals that may have formed. Clamp a candy thermometer to the side of the saucepan. Boil the mixture over medium high heat (do not stir) until the temperature reaches 245 degrees F (118 degrees C). (If sugar crystals form on the sides of the pan, wash them down with a heatproof pastry brush that has been dipped in warm water.)

Remove from heat and stir in the vanilla extract. Pour the caramel into 
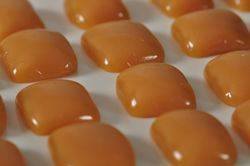
your prepared pan and let cool, undisturbed, for at least eight hours, or overnight.

With a sharp knife, (oiled with a tasteless vegetable oil, like safflower), and with a sawing motion, cut into squares or rectangles. These caramels can be stored at room temperature, between layers of wax paper, for several days. Caramels make a nice gift, especially when wrapped in wax paper or cellophane.

Makes about 48 pieces. Preparation time 40 minutes.

Adapted From:

Rosen, Michael J. Baking from the Heart. Broadway Books. New York: 2004.

Caramels:

1 1/2 cups (360 ml) heavy whipping cream (has a 36-40% butterfat content)

1 cup (200 grams) granulated white sugar

1 cup (210 grams) packed light brown sugar

2 teaspoons kosher salt

2 teaspoons pure vanilla extract


New Videos


Top 40 Video Recipes of 2012

1. Red Velvet Cake

2. Vanilla Cupcakes

3. Shortbread Cookies

4. Red Velvet Cupcakes

5. Peanut Butter Balls

6. New York Cheesecake

7. Chocolate Cupcakes

8.Royal Icing

9. Chocolate Chip Cookies

10. Carrot Cake

11. Whipped Cream Frosting

12. Brownies

13. Pound Cake 14. Fruit Tart 15. Oatmeal Cookies
16. Sugar Cookies 17. Cinnamon Rolls 18. Pavlova 19. Coconut Macaroons 20. Ganache
21. Lemon Curd 22. Biscuits 23. Banana Bread 24. Meringue Cookies 25. Apple Pie
26. Snickerdoodles 27. Yellow Butter Cake 28. Molten Chocolate Cakes 29. Gingerbread Men 30. Chocolate Truffles  
31. Cream Puffs 32. Lemon Cupcakes 33. Orange Chiffon Cake 34. Nanaimo Bars 35. Lemon Bars
36. German Chocolate Cake 37. M&M Cookies 38. Cake Pops 39. Black Forest Cake 40. French Macarons


Contact Us   Privacy Policy Follow Joyofbaking On Twitter Stephanie Jaworski+

Use of materials on all pages on the domains Joyofbaking.com, joyofbaking.mobi, the Joyofbaking.com Facebook Page, @joyofbaking on Twitter, the Joyofbaking.com RSS Feed, the Joyofbaking.com email list the Joyofbaking1 YouTube Channel and any emails sent from @joyofbaking.com are entirely at the risk of the user and their owner, iFood Media LLC will not be responsible for any damages directly or indirectly resulting from the use.

References cited may include a link to purchase the referenced book on Amazon.com. Joyofbaking.com receives a commission on any purchases resulting from these links.

This website and the contents are not endorsed or sponsored by the owner of the "Joy of Cooking" series of books or its publisher Simon & Schuster, Inc. Video icons by Asher.

Content in any form may not be copied or used without written permission of Stephanie Jaworski, Joyofbaking.com.  Students and non profit educators may use content without permission with proper credit. 

A baking resource on the Internet since 1997

Copyright  1997 to 2013 iFood Media LLC